I own several Garmin devices, including an older Oregon 600 that I have used for years for hiking and biking. When I first got it, I also purchased an SD card to expand its anemic internal storage. I then downloaded a nice selection of maps from GPSFileDepot and OpenStreetMap. This worked well for a while, and then one day I did some data cleanup and the Garmin started ignoring the card entirely when loading maps. The weird thing is the card would work just fine with the GPS connected to my Mac via a USB cable, but the Garmin itself wouldn’t acknowledge it. I honestly don’t recall exactly what I did, but I did something that broke the SD card entirely.
I’ve done so much tinkering to fix this problem. I tried multiple other SD cards, uninstalled maps, reinstalled maps, formatted cards, manually copied maps, and more. It just would not work. After a lot of tinkering, I gave up and just made due with the internal storage for managing my maps. Every few years I would try again, only to get frustrated and move on. But this year I stumbled across the solution and finally struck pay dirt!
If you’re having a problem getting your Garmin to read an SD card, this may help you. First, make sure you review Garmin’s help for when an SD card is not detected. If this advice still doesn’t resolve your problem, then keep reading.
It turns out that Macs have been formatting drives using a newer partitioning scheme called GUID that some Garmin devices cannot read. Instead, they seemingly require that SD cards be formatted using an older partition scheme called Master Boot Record (or MBR). Here’s an article explaining the difference if you want to learn more.
You can make Disk Utility format your SD drive using the MBR approach. But before you begin, please be careful! Disk Utility is a powerful tool that can erase your data and wipe your hard drive. Please pay close attention to the details. (Note, these steps were performed with a Mac running macOS Big Sur 11.4.)
Steps
Step 1 – Start by making sure your Garmin device has an SD card installed inside of it. Follow your product directions to install the SD card.
Step 2 – Connect the Garmin device to your Mac. You should see your Mac mount two separate Garmin drives – one for the device itself and the other for the SD card. If you don’t see this, STOP! These instructions will not help you.
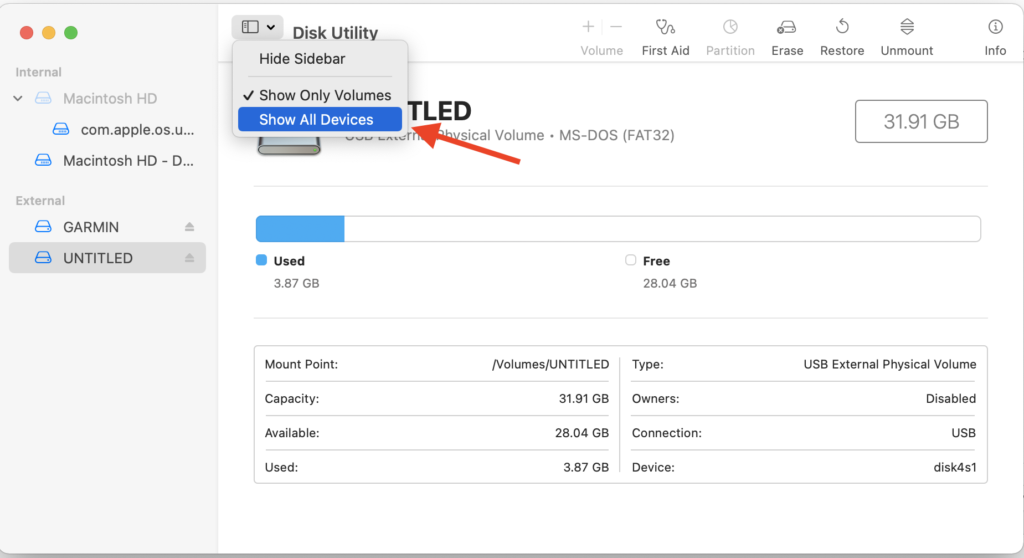
Step 3 – Note the name of the drive for the SD card. This is very important – you will need to erase and reformat this drive. You do not want to erase or reformat the wrong drive. In this example, we’re looking at the “UNTITLED” drive.
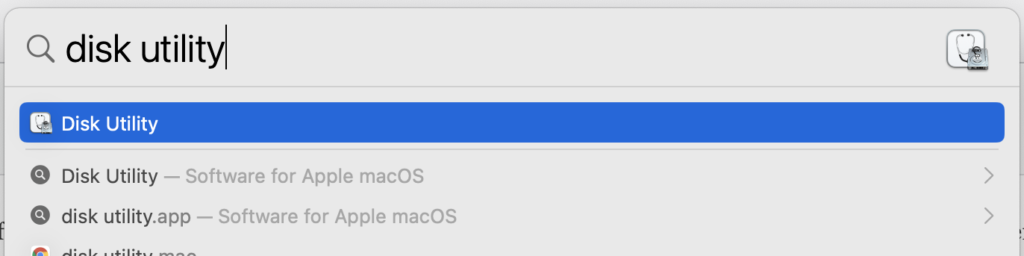
Step 4 – Start Disk Utility. You can do this by opening your Spotlight Search using ⌘ Space and then typing Disk Utility.
Step 5 – Change the view in Disk Utility to Show All Devices.
Step 6 – The sidebar will change to show your Garmin SD card is now “contained” by a parent device. For my Oregon, this device is called Garmin Oregon SD Card Media. On your device, it may be different. Click on this parent device. Be careful – don’t select the drive for the Garmin itself. In this screenshot, note that “UNTITLED” is contained by the SD Card Media device, which is the device we want.
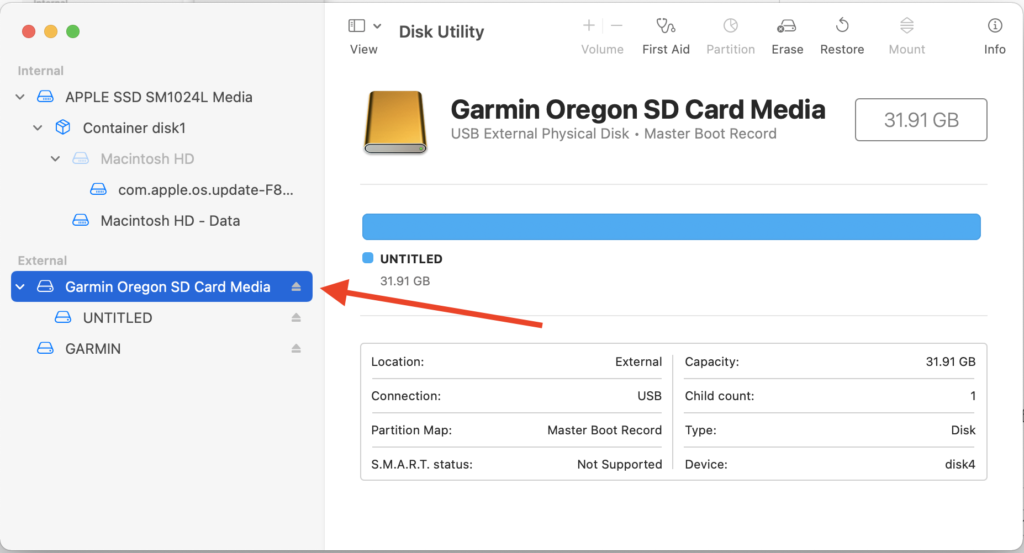
Step 7 – I’ve already fixed my drive, so the screenshot above says “Master Boot Record” under the device name. If yours says “GUID Partition Map” then proceed with the next step.
WARNING! We’re about to erase this SD card in the next step. Do not proceed unless you’re ok with erasing this drive. Please make a backup first.
ANOTHER WARNING! Make sure you’re confident about the device you have selected. If you have selected the wrong device, you may erase the wrong drive. If you are not sure, do not proceed!
Step 8 – Click the Erase button in the toolbar to open the Erase panel. Set the format to MS-DOS (FAT) and the scheme to Master Boot Record.
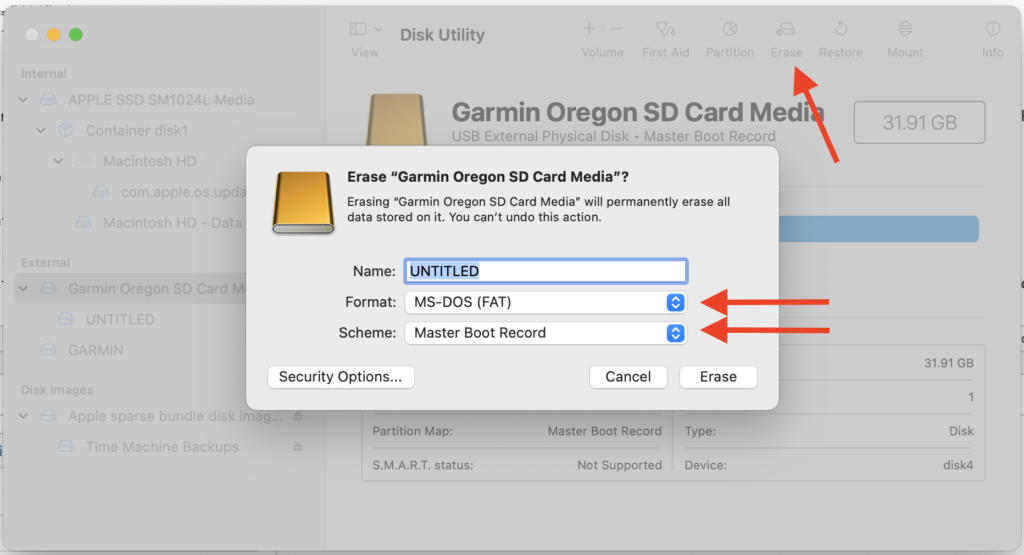
Step 9 – Click Erase to start the process. Disk Utility will reconfigure the drive and remount it in the correct format. At this point, you can reinstall your maps on the SD card using MapInstall and configure them in your device like normal.
If this does not work for you, then I recommend contacting Garmin for more help.
This worked, thank you so much!
Thank you but it’s no more working on mac osx tahoe
Hi Stanton
Thank you very much for your advice.
I have just received a clean and basically new Garmin Oregon 600 via Ebay, it is my tenth. I use them for geocaching and outdoor activities for groups and have never had this problem. I have installed an AusTopo sd card (Australia) from an Oregon 600 with a damaged screen. It works fine on that unit.
However, it is not visible in the map selection function on the GPS (or on the map page) but it works fine through BaseCamp. I am a little terrified at the prospect of attempting your fix, so firstly, is your process designed to help my problem, and can it be done with MacOS Sequoia 15.7.4? Nothing else through Garmin forums seems to address this particular problem.
I would greatly appreciate your feedback. It’s a very frustrating situation.
All the best.
Brendan Murray
Have you tried using the same card in another Oregon 600 you know works? Does it read in other Oregons? If so, then the problem isn’t with the card but with the broken Garmin. If it doesn’t work in any Garmin, then it could be the card has been formatted in a way the Oregons don’t like.
I’m not familiar with AusTopo, but it sounds like this SD card has valuable data on it? If so, you should absolutely back it up before doing anything like this technique because it deletes all of the card’s data. You should also test that you can restore the contents to another card, just in case.
I haven’t tried this on newer versions of MacOS, but the underlying issue has to do with GUID vs. MBR. You can theoretically do this kind of reformatting on Linux or Windows. The software may vary over time.
Saga Pt 2.
In desperation I tried a third, though identical sd card. The damned thing worked!
Somehow the situation is resolved, for now.
Cheers
Brendan